What is Writer?
Writer is the word processing component of LibreOffice. In addition to the usual features of a word processor (spell check, thesaurus, hyphenation, auto-correction, find and replace, automatic generation of tables of contents and indexes, mail merge, etc.), it offers a range of important capabilities that will be covered in detail in upcoming articles:

- Templates and styles
- Layout methods, including styles, frames, columns, and tables
- Automated tables of contents and indexes
- Embedding or linking images, equations, spreadsheets, and other objects
- Integrated drawing tools
- Master documents, to group a collection of documents into a single document
- Track changes during revisions
- Lists
- Data tables
- Database integration, including a bibliographic database
- Mail merge
- Export to PDF and EPUB
- Document digital signatures
- Form design and filling
The Writer Interface
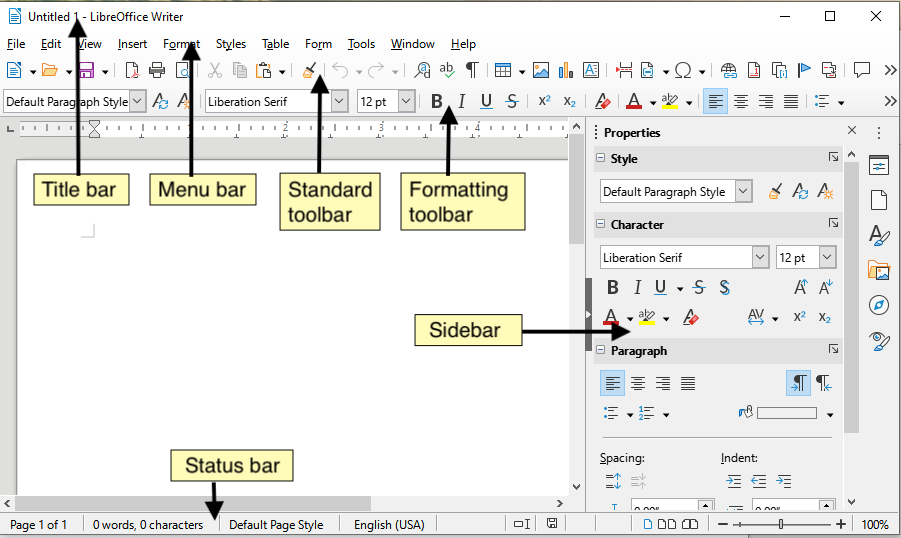
The main workspace of Writer is illustrated in Figure 1. The default menus and toolbars will be described in the article, Overview of LibreOffice. Some other features of the Writer interface are covered below. Other variations of the user interface will be described in the article, Customization of LibreOffice (coming soon).
Figure 1: The main workspace of Writer
Status Bar
The Status Bar of Writer provides information about the document and convenient ways to quickly modify certain document features.
Figure 2: Components of the Writer Status Bar
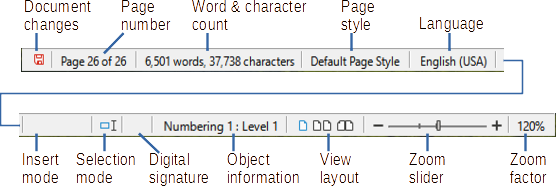
Document Status Change
The icon changes color to indicate whether the document has unsaved changes or if it has been modified and the changes have not been saved. When there are unsaved changes, you can click on this icon to save the document.
Page Number
Displays the current page number, the sequential page number (if different), and the total number of pages in the document. For example, if you restarted page numbering at 1 on the third page, its page number is 1, and its sequence number is 3.
If bookmarks have been set in the document, right-clicking on this field brings up a list of bookmarks; click one to navigate to that location.
To access a specific page in the document, click on this field. A small dialog box "Go to Page" appears. Type the required page number and click OK or press Enter.
Word and Character Count
The word and character count of the document is updated as you modify it. When text is selected, the word and character count for the selection appears here.
The character count includes spaces. To display the character count excluding spaces, click on the word count in the status bar or choose Tools > Word Count.
You can also see the word and character count (and other information, including the number of pages, tables, and graphics) for the entire document in File > Properties, Statistics tab.
Page Style
Displays the style of the current page. To select a different page style, right-click on this field. A list of page styles appears; click one to select it. To edit the attributes of the current page style, left-click on this field. The Page Style dialog opens.
Warning
Changing the page style here can affect the styles of subsequent pages, depending on how page styles are configured.
Text Language
Displays the language and locale at the cursor position, or for the selected text, which is used to check spelling, grammar, hyphenation, and thesaurus.
Click to open a menu where you can choose a different language or locale for the selected text or for the paragraph where the cursor is located. You can also choose None (Do not check spelling) to exclude the text from spell checking or choose More to open the Character dialog. All directly formatted language settings can be reset to the default language from this menu.
Insertion Mode
This area is empty in Insertion mode. Click to switch to Overwrite mode; click again to return to Insertion mode. In Insertion mode, all text located after the cursor position shifts to make room for the text you are entering; in Overwrite mode, the text after the cursor position is replaced by the text you are entering. This function is disabled in Save Changes mode.
Selection Mode
Click to toggle from one selection mode to another; right-click to select the required mode from a context menu. The icon does not change, but when you hover over this field, a tooltip indicates which mode is active.
|
Mode |
Effect |
|---|---|
|
Standard Selection |
Click in the text where you want to position the cursor and drag to the location where you want the selection to end. Any previous selection is deselected. |
|
Extend Selection (F8) |
Clicking in the text extends or reshapes the current selection. |
|
Add to Selection (Shift+F8) |
A new distinct selection is added to an existing selection. The result is a multiple selection. |
|
Block Selection (Alt+Shift+F8) |
A block of text can be selected. |
On Windows systems, you can hold down the Alt key while dragging to select a block of text. You do not need to enter block selection mode.
Digital Signature
If the document has been digitally signed, an icon is displayed here; otherwise, it is empty. To sign the document or to view the certificate, click on the area or icon. Refer to the article (coming soon), Printing, Exporting, Emailing, for more information.
Section or Object Information
When the cursor is over a section, title, or list item, or when an object (such as an image or table) is selected, information about that item appears in this field. Clicking in this area opens a corresponding dialog box. For more details, refer to the Help.
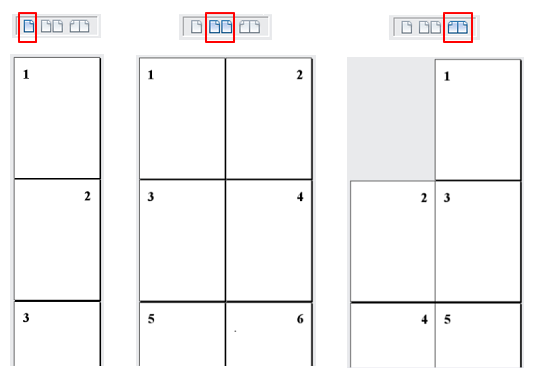
Display Layout
Click an icon to toggle between single-page, multiple-page, and book layout views. You can edit the document in any view. Zoom settings interact with the layout of the selected view and the window width to determine how many pages are visible within the window.
Figure 3: View layouts: single page, multiple pages, book
Zoom
To change the zoom level of the view, drag the Zoom slider, or click the + and - signs, or right-click on the zoom level percentage to bring up a menu of zoom values to choose from, or click on the zoom level percentage to bring up the Zoom and Layout dialog where you can specify other zoom values.
Sidebar
The sidebar is normally open by default on the right side of the Writer window. If needed, select View > Sidebar from the menu bar or press Ctrl+F5 to display it.
The Writer sidebar contains five default decks: Properties, Page, Styles, Gallery, Navigator, and Style Inspector. Each deck has a corresponding icon on the tab bar to the right of the sidebar, allowing you to switch between them.
Each deck consists of a title bar and one or more content panels. Some panels contain a small "More Options" button, which opens a dialog box to provide a greater choice of editing commands. When a dialog box is open, the document is locked for editing until the dialog box is closed.
The decks are described below.
Properties Deck
Contains tools for direct formatting of content.
When text is selected, these panels display:
- Style: applies a paragraph style at the cursor position. Create or update a style.
- Character: modify text based on font type, size, color, weight, style, and spacing.
- Paragraph: modify the paragraph by alignment, lists or bullets, background color, indentation, and spacing.
- Table: If the cursor is in a table, this panel also appears. You can insert, select, delete rows and columns; split/merge cells; set row height and column width.
When a chart or image is selected, these panels display:
- Area: Modify the fill and transparency of the image background. Other colors, gradients, hatching, patterns, and selection and import of bitmaps are available in More Options.
- Wrap: Modify the wrap and spacing when available.
- Image: modify the brightness, contrast, color mode, and transparency of the image.
- Position and Size: modify the attributes of width, height, rotation, and flipping.
When a drawing object is selected, these panels display:
- Area: Modify the fill and transparency.
- Wrap: Modify the wrap and spacing when available.
- Position and Size: modify the attributes of width, height, rotation, and flipping.
- Effect: add and adjust a Glow or Soft Edge effect to the object.
- Line: Modify the style, width, color, and transparency.
When a frame is selected, the Area and Wrap panels display.
When a video or audio clip is selected, these panels display:
- Media Playback: control play, pause, stop, seek, loop, and volume.
- Position and Size: Modify width and height.
Page Deck
Modifies the page style to change the most commonly used page properties. It includes four panels:
- Format modifies the size, width, height, orientation, and margins of the page.
- Styles modify the numbering scheme, background, layout (specifies whether the page style applies to odd or even pages or both), and columns.
- Header and Footer activate/deactivate and modify respective margins, spacing, and content.
Warning
Be aware that by modifying the options in the pages deck, you will change the page style used, altering not only the current page but all pages in the document using the same page style.
Styles Deck
Manages the styles used in the document. This includes applying existing styles, modifying them, or creating new styles. See the article, Styles and Formatting, for more information.
Gallery Deck
Contains images and diagrams included in the Gallery themes. The Gallery has two sections. The first lists themes by name (Arrows, Bullets, Diagrams, etc.) and the second displays the images of the selected category. Select the New button to create new categories. To insert an image into a file or add a new image to the new category, drag and drop the selected image. See the article, Images and Graphics, for more information.
Navigator Deck
Facilitates navigation to specific types of content and rearranging content based on categories such as headings, tables, frames, images, etc.
Style Inspector Deck
Displays all attributes of paragraph styles, character styles, and manual (direct) formatting of the selected text. For more information, refer to the article: Using Styles.
Modifying Document Views
Writer offers three ways to display a document: Normal, Web, and Full Screen. To change views, go to the View menu and select the desired view.
Normal View
The normal view is the default view in Writer. It shows what the document will look like when printed or created as a PDF. In this view, you can hide or show headers and footers and the space between pages by choosing View > Show Spaces in the menu bar. This only works when single-page view is enabled in the status bar. Hiding white spaces also works in full-screen mode.
Web View
The web view shows what the document will look like if displayed in a web browser; this is useful when creating HTML documents. In web mode, you can only use the Zoom cursor; the layout display buttons in the status bar are disabled, and most choices in the Zoom and layout display dialog are unavailable. There are no visual indications of page boundaries.
Full Screen View
In full-screen mode, no toolbars or sidebar are displayed; the document occupies the entire available area, using the previously selected zoom and layout settings. To exit full-screen view and return to the previous view, press the Escape key or click the Full Screen button on the floating toolbar in the top left corner. You can also use Ctrl + Shift + J to toggle between full screen and previous views.
This concludes an overview of the Writer interface in LibreOffice.
[staticpage_content:licence]

