 LibreOffice Writer is the word processing component of LibreOffice, a comprehensive and free office suite. This first part introduces the main Writer window, its sidebar, toolbars, rulers, status bar, and the document editing features used to create, format, revise, export, and manage text documents. In addition to the usual features of a word processor (text entry, editing and formatting, spell checker, thesaurus, hyphenation and auto-correction, search and replace...), Writer provides the following important functionalities:
- Track changes during revisions
- Layout methods, including styles, frames, columns, and tables
- Export to PDF and ePub
- Document digital signatures
- Templates and styles
- Built-in drawing tools
- Lists
- Data tables
- Mail merge and merging documents
- Automated tables of contents and indexes
- Master documents for grouping a set of documents into one document
- Fields and forms
- Database integration, including a bibliographic database
- Embedding or linking spreadsheets, equations, and other objects
- And much more
Components of the Main Writer Window
The main Writer window is illustrated in Figure 1. Its features are outlined in this section. Understanding these parts helps new users find common LibreOffice Writer commands for editing text, applying formatting, managing pages, and navigating inside a document.
Note
By default, commands in LibreOffice Writer are grouped into menus and toolbars, as described in this section. Additionally, Writer provides other user interface variants, displaying contextual groups of commands and content. For more information, refer to the "Notebook Bar" in Help and the article, Customizing Writer.
Title Bar
The title bar is located at the top of the Writer window. It displays the filename of the current document. When the document has not yet been named, it will appear as Untitled X, where X is a number. Untitled documents are numbered in the order of their creation.
Menu Bar
The menu bar is located just below the title bar on Windows and Linux, and at the top of the screen on macOS. When you select one of the menus, a submenu drops down to display further options, including:
- Commands that directly trigger an action, such as Close or Save, in the File menu.
- Commands that open dialog boxes, indicated by three dots following a command, such as Find... in the Edit menu.
- Commands that open other submenus, indicated by a right-pointing arrow after a command, such as Toolbars and Zoom, in the View menu. Hovering the cursor over one of these items opens its submenu.
Figure 1: Components of the Main Writer Window

Sidebar
The sidebar is normally open by default on the right side of the Writer window, as illustrated in Figure 1. If necessary, select View > Sidebar from the menu bar to display it. The sidebar also features a Hide/Show icon, as illustrated in Figure 2. When the sidebar is closed, it can be opened by clicking this icon, which will be located at the far right of the window.
The Writer sidebar contains six default decks: Properties, Page, Styles (also displayed as Styles and Formatting in some installations), Gallery, Navigator, and Style Inspector. Each deck can be opened by clicking on its corresponding icon in the tab bar to the right of the sidebar.
Two additional decks are available when experimental features are enabled in Tools > Options > LibreOffice > Advanced: Manage Changes and Design.
Each deck consists of a title bar and one or more content panels. A panel is like a combination of a toolbar and a dialog box. Toolbars and panels in the sidebar share many functions. For instance, the icons used to bold or italicize text exist both in the Formatting toolbar of the main Writer window and in the Character panel of the Properties deck.
Some panels contain a More Options button, which opens a dialog box with additional editing commands. When the dialog box is open, the document is locked for other modifications.
To adjust the width of the sidebar, place the cursor over its left edge. When a double arrow appears, click and drag to the right or left. When the Properties deck is open, you cannot reduce the sidebar to a certain width. When another deck is open, the sidebar can be reduced to the width of its tab bar.
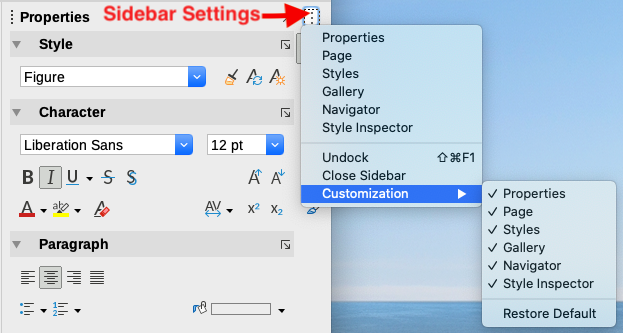
To unanchor the sidebar and make it floating, and to anchor a floating sidebar, use the drop-down list in the sidebar settings above the tab bar (see Figure 3). In the same list, you can use the Customization menu to choose which tabs you want to include in the sidebar.
Figure 2: Properties Deck of the Sidebar
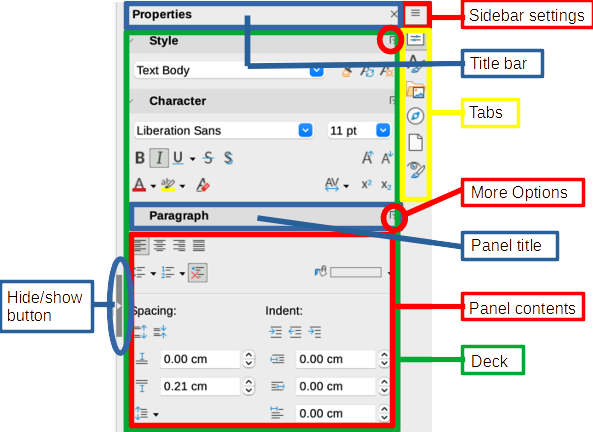
Figure 3: Sidebar Settings Menu
Sidebar Decks
The decks contained in the sidebar are described below.
Properties: Contains tools for directly formatting content.
When text is selected, these panels appear:
- Style: apply, create or update a paragraph style.
- Character: modify text properties such as font name, size, color, weight, or character spacing.
- Paragraph: modify alignment, background color, indentation, and spacing of a paragraph, and toggle between numbered or bulleted lists.
When the cursor is in a table, this panel appears in addition to the text panels.
- Table: modify table properties, such as inserting or deleting rows, merging or splitting cells, setting row heights and column widths, background color, and borders.
When a graphic or image is selected, these panels appear:
- Area: modify the fill mode and transparency of the background.
- Image: modify brightness, contrast, color mode, or transparency of the graphic.
- Wrap: changes the position of the graphic relative to surrounding text, where these modifications are available.
- Position and Size: modify width, height, rotation, or flipping.
When a drawing object is selected, these panels appear:
- Area: modify the fill mode and transparency of the background.
- Effect: add and adjust a Glow or Soft Edge effect to the object.
- Line: modify arrows, line style, width, color, or transparency.
- Position and Size: modify width, height, rotation, or flipping.
When a frame is selected, these panels appear:
- Area: modify the fill mode and transparency of the background.
- Wrap: changes the position of the graphic relative to surrounding text, where these modifications are available.
When a video or audio clip is selected, these panels appear:
- Media Playback: control play, pause, stop, seek, loop, and volume.
- Position and Size: modify width and height.
Styles: Manage the styles used in the document, apply existing styles, create new styles, or modify them. For more information, refer to the articles Introduction to Styles and Using Styles.
Gallery: displays images and diagrams included in the gallery themes. The Gallery has two sections: the first lists themes by name (Arrows, Bullets, Diagrams, etc.), and the second displays images in the selected theme. For more information on using the Gallery to add images to a document, create new themes, and add your images, refer to the article Images and Graphics.
Navigator: browse the document and reorganize its content by selecting content categories such as headings, tables, frames, images, etc. For more information, refer to the section "Using the Navigator".
Page: Contains tools for directly formatting the page style. It has four panels:
- Format: modify the size, width, height, orientation, and margins of the page.
- Styles: modify the page numbering style, background, layout, and number of columns.
- Header: enable/disable the header and modify its margins, spacing, and content.
- Footer: enable/disable the footer and modify its margins, spacing, and content.
Warning
Be aware that by changing the options of the page deck, you will change the page style used, altering not only the current page but all pages using the same page style in this document.
Style Inspector: displays all attributes of paragraph styles, character styles, and direct (manual) formatting of the selected text. For more information, refer to the article Using Styles.
Toolbars
LibreOffice has two types of toolbar placements: anchored (fixed in place) or floating. Anchored toolbars can be moved to different locations (e.g., top, bottom, or side of the workspace) or made floating. Floating toolbars can be anchored.
Show or Hide Toolbars
To show or hide toolbars, go to View > Toolbars in the menu bar, and then click on the name of a toolbar in the dropdown list. An active toolbar will display a check mark next to its name. Note that toolbars created from palettes are not listed in the View menu.
To hide a toolbar, go to View > Toolbars in the menu bar and uncheck the toolbar, or right-click in a blank space between the icons of a toolbar and select Close Toolbars from the context menu.
Most Used Toolbars
In a default LibreOffice installation (Figure 1), the top toolbar, just below the menu bar, is referred to as the Standard Toolbar.
The second toolbar at the top is the Formatting Toolbar. It is context-sensitive; that is, it displays tools corresponding to the current position of the cursor or the selected object. For example, when the cursor is in text, the Formatting toolbar offers text formatting tools. When the cursor is on a graphic (image), the tools are intended for image formatting.
To free up more space for the document, you can choose a single toolbar alternative containing the most used commands. To activate it, select View > User Interface > Single Toolbar.
Other toolbars are available in View > Toolbars.
Sub-menus and Tool Palettes
Toolbar icons with a small triangle to their right will display sub-menus, tool palettes, or other methods of selecting items, depending on the icon.
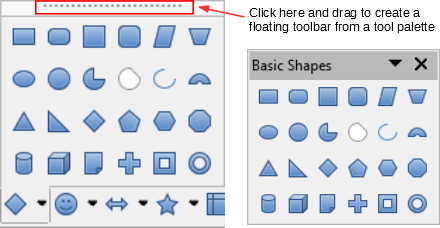
A tool palette is a contextual collection of tools attached to a single tool in a toolbar. The palette can be transformed into a floating toolbar, as illustrated in Figure 4. Once removed from the parent toolbar, it displays a title bar. Tool palettes can be either floating or anchored along an edge of the screen or in one of the existing toolbar areas.
Figure 4: Example of detaching a tool palette
Moving Toolbars
Anchored toolbars can be unanchored and either moved to a new anchored position or left as a floating toolbar.
To unanchor a toolbar:
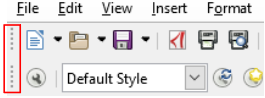
1) Move the mouse cursor over the handle of the toolbar, which is the small vertical bar to the left of an anchored toolbar, as illustrated in Figure 5.
2) Hold down the left mouse button and drag the toolbar to a new location.
3) Release the mouse button.
Figure 5: Toolbar Handles
To move a floating toolbar, click on its title bar and drag it to a new floating location or anchor the toolbar at the top or bottom of the main window.
Note
You can also anchor a floating toolbar by holding down the Ctrl key and double-clicking in the toolbar's title bar.
Tip
If the toolbar handle is not displayed, its position is locked. To unlock the toolbar, right-click on it, then deselect the option Lock Toolbar Position.
Floating Toolbars
Writer includes several toolbars, with default settings corresponding to the current position of the cursor or selection (when toolbars are activated). For example, when the cursor is in a table, the Table toolbar appears, and when the cursor is in a numbered or bulleted list, the Bullets and Numbering toolbar appears. You can reposition or anchor these toolbars as described in "Moving Toolbars" above.
Customizing Toolbars
You can customize toolbars in several ways, including choosing the visible icons and locking the position of an anchored toolbar. You can also add icons and create new toolbars, as described in Chapter 20, Customizing Writer.
To position the toolbar:
- Right-click somewhere in the floating toolbar and click Anchor Toolbar in the context menu to anchor the selected floating toolbar. By default, a toolbar will anchor at the top of the workspace. You can reposition the toolbar to another anchored position. See "Moving Toolbars" on page 1.
- Click on Anchor All Toolbars to anchor all floating toolbars.
- Click on Lock Toolbar Position to lock an anchored toolbar in its anchored position. Locking maintains the toolbar's position even when other toolbars on the same bar change locations.
- Click on Close Toolbar to close the selected toolbar.
You can access the customization options for a toolbar by right-clicking in a blank space between the icons of the toolbar to open a context menu. Then choose from the following options:
- To show or hide the icons defined for the selected toolbar, click on Visible Buttons in the context menu. Visible icons on a toolbar are indicated by a border around the icon (Figure 6) or by a check mark next to the icon, depending on your operating system. Select or deselect icons to hide or display them in the toolbar.
- Click on Customize Toolbar to open the Customize dialog. See Chapter 20, Customizing Writer, for more information.
Figure 6: Toolbar Context Menu and Selecting Visible Icons on the Toolbar

Rulers
The horizontal ruler at the top of the workspace is visible by default, but the vertical ruler on the left is hidden by default. To enable the vertical ruler, choose View > Rulers > Vertical Ruler from the menu bar, or choose Tools > Options > LibreOffice Writer > View. To quickly display or hide both rulers, use the Ctrl+Shift+R key combination.
Tip
The horizontal ruler has a comment button on its right end; click it to quickly display or hide comments.
Status Bar
The status bar in Writer is located at the bottom of the workspace. It provides information about the document and convenient means to quickly modify some document features. It can be hidden by unchecking it in the View menu.
Figure 7: Status Bar in Writer
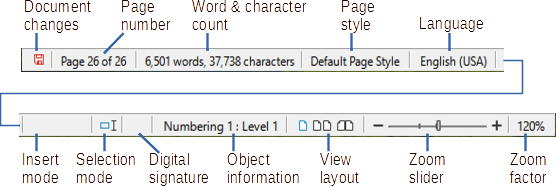
Document Modification Status
This icon changes when the document has been modified but not saved. Clicking on this icon saves the document.
Page Number
Displays the sequence number of the currently active page, the total number of pages in the document, and the current page number (if different from the sequence number). For example, if page numbering is reset to 1 on the third page of a 6-page document, the sequence number is 3, the total number of pages is 6, and the current page number is 1, as illustrated in Figure 7.
If bookmarks have been set in the document, right-clicking on this field will display a list of bookmarks. Click on a bookmark to move the cursor to that position in the document.
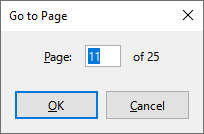
To go to a specific page in the document, left-click on this field to open the Go to Page dialog (Figure 8). Enter the desired page number and click OK.
Figure 8: Go to Page Dialog
Word and Character Count
The number of words and characters in the document is displayed in the status bar and is updated as you modify it. If you select a portion of text, the count of that selection will temporarily replace the total document count.
By default, the character count includes spaces. To display the character count excluding spaces, click on the word count in the status bar or choose Tools > Word Count.
You can also see the number of words and characters (and other information, including the number of pages, tables, and images) for the whole document in File > Properties > Statistics.
Page Style
Displays the page style of the current page. To select a different page style, right-click on this field. A list of page styles appears; click on one to select it. To edit the attributes of the current page style, left-click on this field. The Page Style dialog opens.
Warning
Changing the page style here may affect the styles of other pages, depending on the configuration of page styles. See Chapters 8 and 9 for more details on styles.
Text Language
Displays the language and locale used for spell checking, hyphenation, and thesaurus. It is based on the position of the cursor or the selected text.
Click to open a menu where you can choose another language/locale for the selected text or for the paragraph where the cursor is located. You can also choose None (Do not check spelling) to exclude the text from spell checking or Reset to Default Language. Choosing More... opens the Character dialog. For more information, refer to Chapter 3, Working with Text: Basics.
Insert Mode
This area is empty in Insert mode. Click to switch to Overtype mode; click again to return to Insert mode. In Insert mode, any text to the right of the cursor position advances to make room for the text you are entering; in Overtype mode, the text following the cursor position is replaced by the text you are entering. This function is disabled when Edit > Track Changes > Record is enabled.
Select Mode
Click to toggle between select modes (Standard, Extend, Add, and Block). The icon does not change, but when you hover the mouse pointer over this field, a tooltip indicates which mode is active.
When you right-click on this field, a context menu displays the available options. See Chapter 3, Working with Text: Basics, for more details.
Digital Signature
If the document has been digitally signed, an icon appears here; otherwise, it is empty. Click here to sign the document or to view the existing certificate. Refer to Chapter 8, Printing, Exporting, Emailing, for more information.
Information on Section or Object
When the cursor is in a section, title, or list item, or when an object (such as an image or table) is selected, information about that item displays in this field. Clicking in this area opens the corresponding dialog.
Object | Displayed Information | Open Dialog |
Image | Size and Position | Image |
List Item | Outline and List Style | Bullets and Numbering1 |
Title | Outline Numbering Level | Bullets and Numbering1 |
Table | Cell Reference or Cursor Name or Number | Table Format |
Section | Title Name | Edit Heading |
Other | (Empty) | Fields |
1 If a list style has been used with a list item or title, no dialog appears.
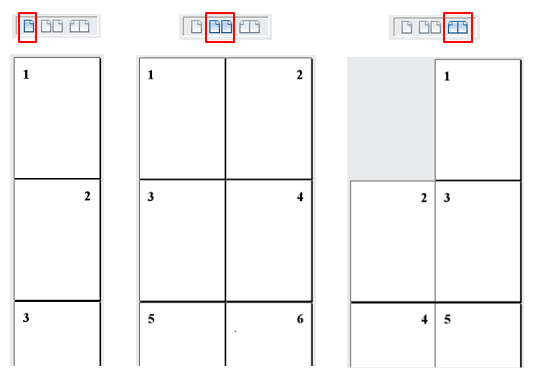
Show Layout
Click on the corresponding icon to toggle between single page, multiple pages, and book views (Figure 9). You can modify the document in any view. Zoom settings interact with the layout of the selected view and the width of the window to determine how many pages are visible in the document window.
Figure 9: Layouts of Views: Single Page, Multiple Pages, Book
Zoom
To change the zoom level of the view, drag the Zoom slider, or click the + and - signs, or right-click on the zoom percentage to bring up a list of zoom values to choose from. Zoom interacts with the layout of the selected view to determine how many pages are visible in the document window.
FAQ about LibreOffice Writer basics
What is LibreOffice Writer used for?
LibreOffice Writer is used for word processing. It supports text entry, editing, formatting, spell checking, search and replace, styles, tables, lists, templates, mail merge, PDF export, ePub export, and digital signatures.
Where are the main formatting tools in LibreOffice Writer?
The main formatting tools are available in the Formatting toolbar and in the Properties deck of the sidebar. These tools can change text, paragraph, table, image, drawing object, frame, and media properties depending on what is selected.
How can I show or hide the sidebar in Writer?
You can show the sidebar by selecting View > Sidebar from the menu bar. The sidebar also includes a Hide/Show icon that can open or close it from the right side of the Writer window.
What information does the Writer status bar display?
The status bar displays document information such as modification status, page number, word and character count, page style, text language, insert mode, select mode, digital signature status, object information, view layout, and zoom.
Can LibreOffice Writer export documents to PDF?
Yes. Export to PDF is one of the important Writer functionalities listed in this introduction, along with ePub export and document digital signatures.
Conclusion
This introduction to LibreOffice Writer explains the main parts of the Writer window and the tools used for everyday document editing. The title bar, menu bar, sidebar, toolbars, rulers, and status bar give access to common actions such as saving, formatting, navigating, changing page settings, checking word count, managing styles, and adjusting the document view.
Read More: Introduction and Getting Started with LibreOffice Writer (Part 2)
[staticpage_content:licence]

